Balding AI field guide
Photo Comparison Methodology
A useful hair timeline is built from repeatable sessions, not dramatic individual pictures. Fix the camera, light, hair state, and zone order; annotate exceptions; then compare matched images across longer windows.
TL;DR
- Capture front, both temples, top or part, and crown separately.
- Keep camera distance, height, light direction, and dry-hair state stable.
- Take photos on a schedule, but judge direction over four to eight weeks.
- Label haircuts, styling, symptoms, and unusual sessions instead of hiding them.
- This protocol documents visible change; it does not diagnose a condition.
The four-angle capture set
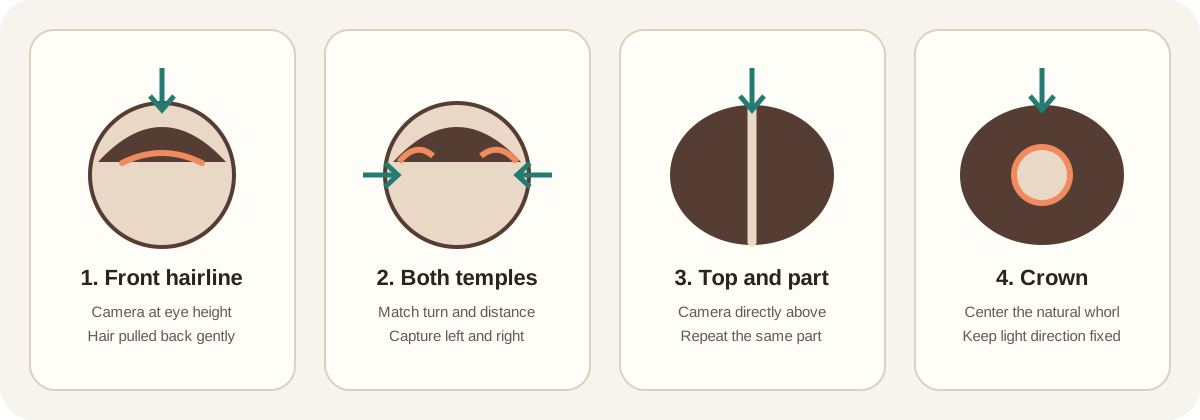
Treat every zone as its own repeated view. A wide selfie is convenient, but it changes perspective and hides small regional differences. Use a front view for the hairline, matched turns for both temples, a directly overhead top or part view, and a centered crown view. The diagram is instructional rather than diagnostic.
1. Lock the environment before the first photo
Choose a place you can reuse. Mark where you stand and where the phone or tripod sits. Note camera height and distance. Use one broad light source in the same position; avoid switching between window light, flash, and a ceiling spotlight. Camera exposure can still vary, so keep the background and framing stable enough to spot a mismatch.
Photograph dry hair before styling products unless your baseline intentionally uses another state. Record that choice. Wet strands, shine, fibers, gels, and different part placement change how much scalp appears even when the underlying hair has not changed.
2. Use landmarks instead of guessing the angle
For the front view, keep the camera close to eye height and frame the eyebrows and hairline together. For temples, repeat the same head turn on each side. For the top, point the camera down without tilting toward the forehead. For the crown, center the natural whorl and preserve the same light direction. Landmarks make the next session easier to reproduce than memory alone.
3. Separate capture cadence from interpretation cadence
A weekly capture is a practical default because it is easy to attach to a routine and provides backup when one session is unusable. It does not mean hair should be judged every week. Hair growth is slow while light, styling, humidity, and camera processing change quickly. Compare the current session with a matched session four to eight weeks earlier, then look for a pattern across more than one pair.
4. Annotate exceptions instead of forcing a comparison
Write down haircuts, a new part, wet hair, styling products, unusual lighting, illness, stress, and visible scalp symptoms. Keep the session in the timeline, but do not treat it as matched evidence. An honest exception label is more useful than deleting every image that does not fit expectations.
Download the printable session worksheet5. Know what the method cannot tell you
This is not a diagnostic or clinically validated measurement protocol. A photograph cannot establish why shedding occurs, confirm follicle miniaturization, or prove that medication, nutrition, or another change caused an outcome. Sudden loss, smooth patches, pain, marked redness, scaling, scarring, or other new symptoms deserve assessment by a qualified professional.
The value of the timeline is narrower and practical: it reduces avoidable photographic noise and gives you organized context to share. That can make a professional conversation clearer without replacing it.
Method sources and rationale
Frequently asked questions
How often should I take hair progress photos?
A weekly session is a practical way to maintain the habit, but compare trends across four-to-eight-week windows. The consistent setup matters more than taking more photos.
Can progress photos diagnose hair loss?
No. Photos document visible patterns. They cannot determine the cause, replace scalp examination or trichoscopy, or prove that a treatment caused a change.
Should I delete a badly lit session?
Keep it, but mark it as an exception and leave it out of direct trend comparisons. The note preserves the timeline without treating a mismatched image as equivalent evidence.
Free · takes 30 seconds
Start a repeatable baseline
Use guided zones and a consistent session routine before drawing conclusions from a single photo.


Continue with the complete tracking guide.